
Deciding to invest in a leaflet can feel like a big step for a small business, it certainly has been for me at the time.
It’s something more corporate and structured than a simple flyer, and it’s a bigger investment as well, both for design and printing costs.
Let’s see together the most common sizes and folds, when to choose them, and how to make the most of them.
Most common leaflet sizes
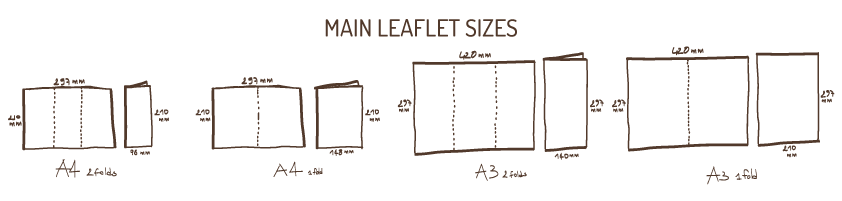
The most common size is an A4 (29.7x21cm) when open, that is 10x21cm when folded.
This size is great because it goes into a standard envelope if you decide to post it.
Then you can have a big A3 (42×29.7cm) that folds into 14×29.7cm.
These are great for menus, or if you need them to be used as a poster on one side for example.
You can also have an A4 that folds into an A5, so open it will still be 29.7x21cm, but it will only have one fold or gate fold, so it will be 14.8 x 21 cm once closed.
Many traders and also takeaways use this format.
You can have the same thing on an A3, so closed with one fold only, or a gate fold it will be an A4 (29.7x21cm).
This is a common size for estate agents and corporate brochures for example.
With every folded size you can then add one or more panels/pages, which will make more space for your content. I won’t get into details here, but ask your printer or designer if you are too tight for the content you have, they’ll be happy to explain what the options are for your chosen size and fold.
Most common leaflet folds
After your leaflet is printed they will be creased (a machine will press them where the fold is meant to go, so that folding is easy) and most times folded for you, unless you want to file them to save some money (don’t underestimate the time it takes!).
Choosing the way your leaflet folds means choosing how to break the content and what to underline, so really stop and give it a thought!
Roll fold
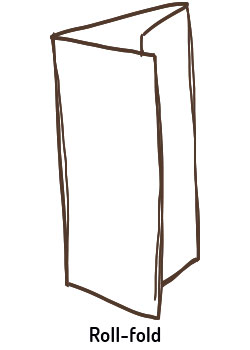
With this fold the different sides roll one inside the other, this allows you to break your content into distinct sections which helps catch your readers eyes and also keeps the attention up.
This is definitely the most common fold, so I’ll stop and help you understand how to tailor your content to make the most of it if you choose it.
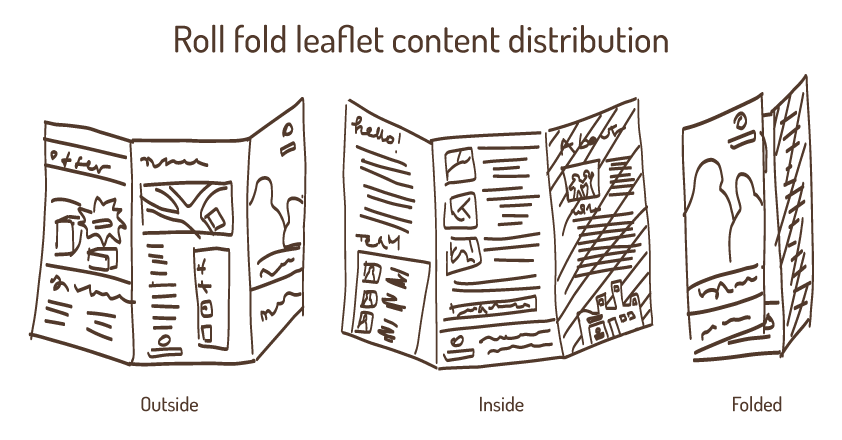
Inside:
You can have your longer, main text that will develop on the three pages. Just make sure you keep the sentences short, break in with bullet points, images or graphs and highlight important points with bolds or boxes.
Leaflet Outside:
Cover:
This is your chance to shine.
Make sure your design is eye catching, choose your photo, illustration or headline carefully and state your main message very clear, whether you are showcasing a new product, an offer or introducing your company for the first time, use just a few works and choose them carefully, don’t try to say it all at once and remember that images and graphics go further and faster ASA first impact!
Don’t forget your logo, and your strap line of you have one.
This page will get your leaflet picked up or not!
Right hand page:
When you look at your open leaflet, you will have one page covering the third one (on the right). That page (which is actually on the outside of the open leaflet) is perfect for an about us, or a list of your products or services with prices, or to highlight a special offer.
This page should have a different background or at least a different graphic layout, this is to help the reader understand that the main text follows below, while this page is to be read separately.
Back:
Don’t be tempted to use this space to just cram in more information.
Being at the back this space is often flat on a surface or simply dismissed, unless it contains info that conclude your subject and your reader will then be looking for, this makes it the perfect space for more technical info such as contact details, an how to find us map, opening times, reviews and social media details.
Half fold leaflet
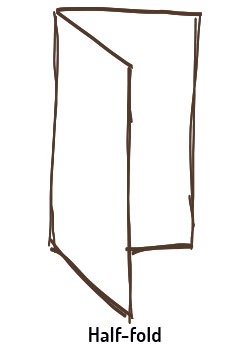
The very basic one, the paper is folded in half on its longer side.
Here you have a cover, a back, and a lot of uninterrupted space for your content. To keep the attention high you should relay on design. Remember, anyone gets really lazy when reading a brochure, make sure you make the important things jump out!
Z fold leaflet
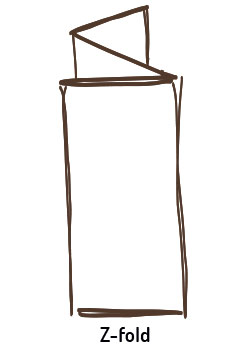
As the word says these leaflets fold into a Z.
This is good for example if you have different categories of products or services because you can break them into different pages, or if you have two main sections of content, for example a corporate area that will go over one side, and a products area that will go on the other. This is because both sides open as a continuous page.
Also you can have the open leaflet designed to look like a little poster.
Gate fold leaflet
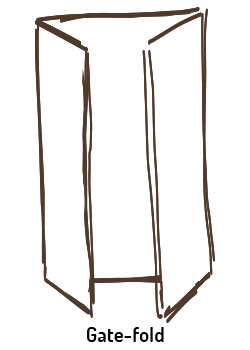
With this fold the closed leaflet is an A5 (15x21cm), but it still has two folds that cover half of the front each.
This fold is used a lot for image based communication as the cover opens like a curtain on the main page.
It’s good for photographers, artists, or to showcase the launch of a new product or service.
In this case the outside will be mainly corporate and light, leaving a more prominent design to the central, main internal page. While the two smaller internal side pages can have description, bullet points and details about the showcased product.
I’ll stop here for now. Hope this helps you decide what is best for your small business.
I’ll leave the what to get ready for your designer and what to expect when commissioning a leaflet for the next time otherwise as google teaches, you’ll get bored and stop reading!
Do get in touch if you need more advice though, I am happy to help!